The home screen: one-tap recording
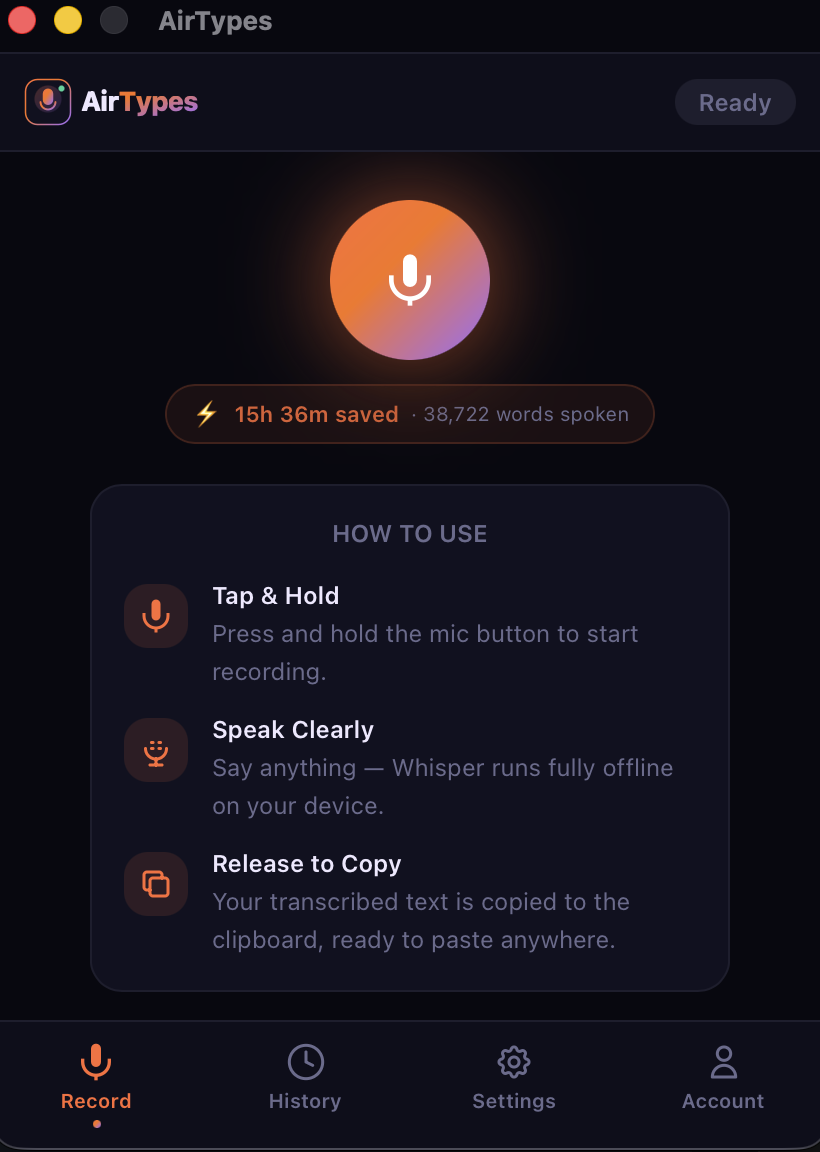
When you open AirTypes, you land on the Record tab. Here's what you see:
- Microphone button — tap and hold to record, or use your global hotkey from any app.
- Stats bar — shows total time saved and words spoken. In this example: 15 hours saved across 38,722 words.
- How to Use card — a quick reminder of the three steps: tap and hold, speak clearly, release to copy.
AirTypes runs in your system tray (Linux) or menu bar (macOS). You don't need to keep the window open — the global hotkey works from any application.
Setting up your hotkeys
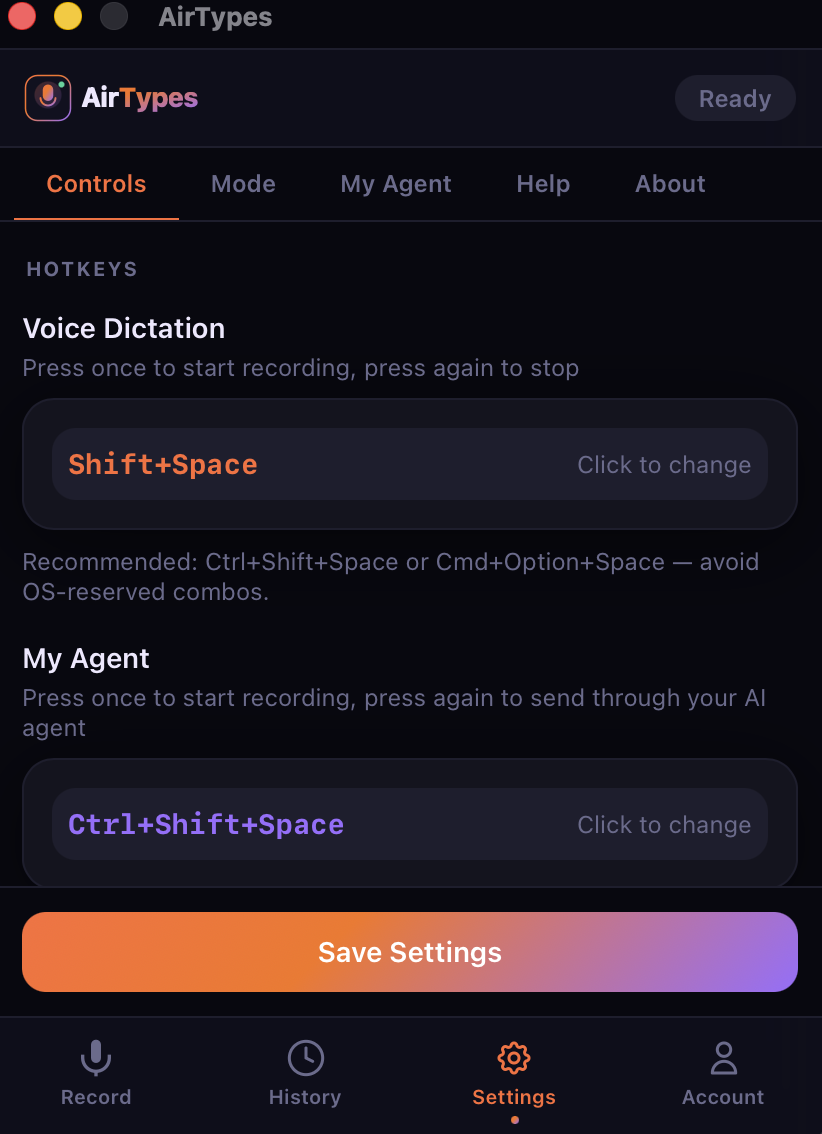
AirTypes has two global hotkeys — one for regular voice dictation and one for My Agent (AI routing):
- Voice Dictation hotkey (default: Shift+Space) — press once to start recording, press again to stop. Your transcribed text appears at your cursor.
- My Agent hotkey (default: Ctrl+Shift+Space) — same flow, but your speech is sent through your configured AI before being typed.
Click the hotkey pill to change it. Use any key combination — AirTypes recommends avoiding OS-reserved combos like Cmd+Space (Spotlight on macOS).
How the hotkey flow works
- Place your cursor in any text field — email, Slack, VS Code, anywhere.
- Press the hotkey. AirTypes starts recording (you'll hear a beep if sound feedback is enabled).
- Speak naturally in full sentences.
- Press the hotkey again (or release if using hold mode). AirTypes transcribes on your device.
- Filler words removed, grammar fixed, and text appears at your cursor.
Choosing an injection mode
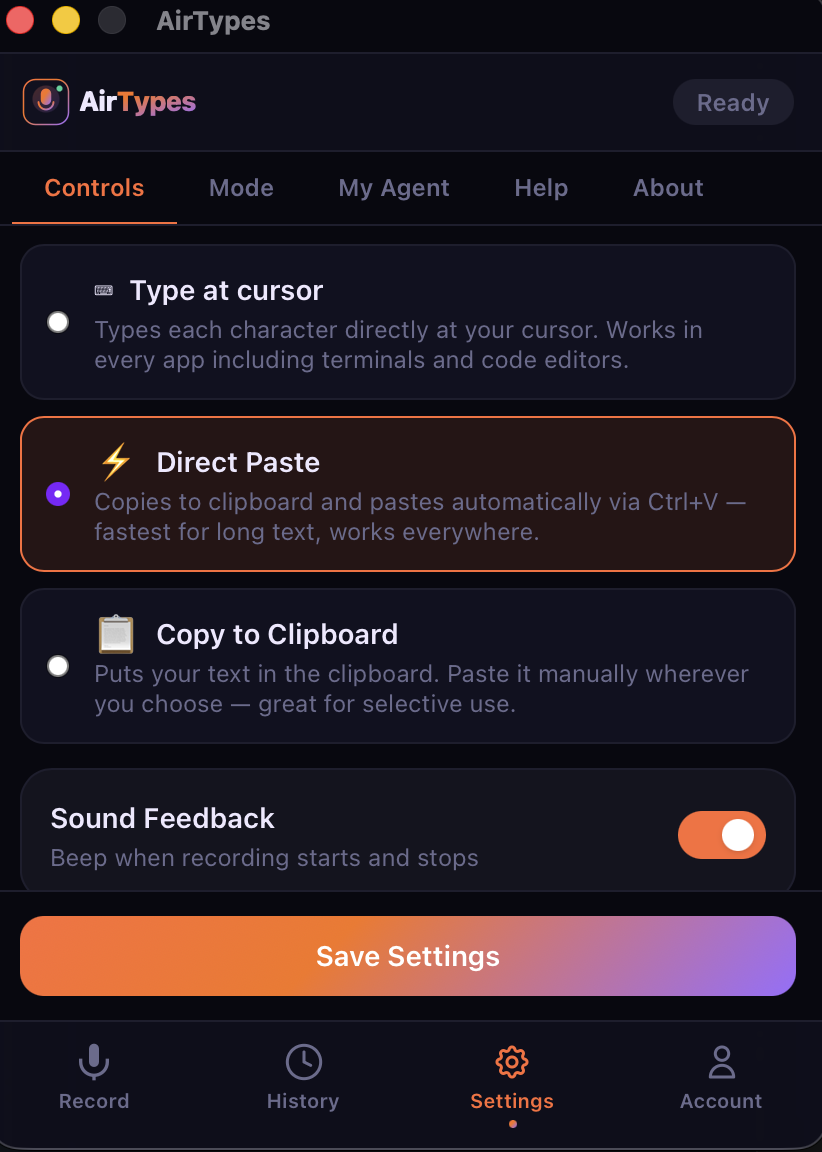
After AirTypes transcribes your voice, it needs to get the text into your active application. There are three ways:
Type at Cursor
Simulates keyboard input, typing each character one by one at your cursor position. Works in every app including terminal emulators and code editors. Slowest for long text, but most compatible.
Direct Paste (recommended)
Copies text to clipboard and pastes it automatically via Ctrl+V / Cmd+V. Fastest method for long transcriptions. Works everywhere that supports paste.
Copy to Clipboard
Puts text in your clipboard without auto-pasting. You paste manually where you want it. Best for selective use — when you want to review before placing the text.
Sound Feedback toggle at the bottom — plays a short beep when recording starts and stops, so you know AirTypes is listening even without looking at the screen.
Picking the right accuracy tier
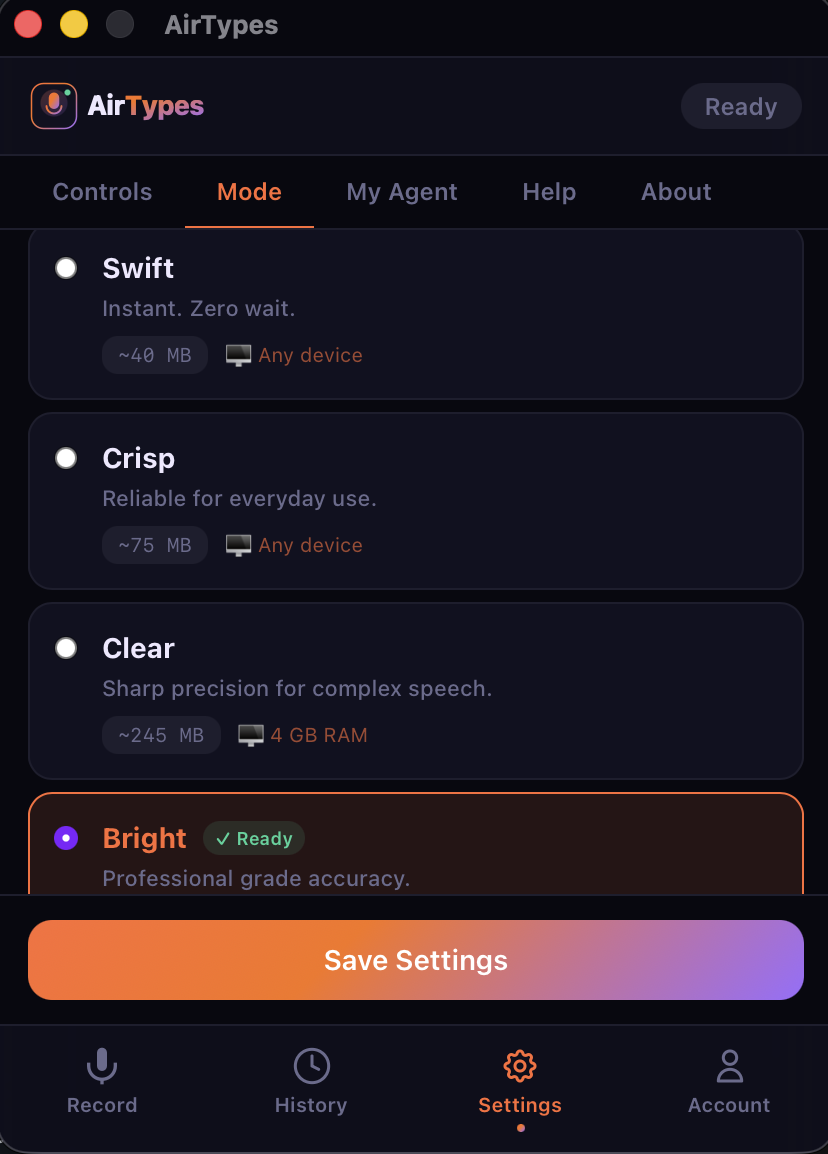
Speech recognition runs entirely on your device. You choose from four tiers (Swift through Bright):
| Model | Size | Best for |
|---|---|---|
| Swift | ~40 MB | Quick notes, any device. Near-instant. |
| Crisp | ~75 MB | Everyday use. Good accuracy, fast. |
| Clear | ~245 MB | Complex speech, technical terms. Needs 4 GB RAM. |
| Bright | Largest | Professional grade. Best accuracy available. |
Which should you pick? Start with Crisp for daily use. If you dictate technical content (code reviews, medical notes, legal text), try Clear or Bright. You can switch models at any time — they download once and stay on your device forever.
My Agent: route voice to your own AI
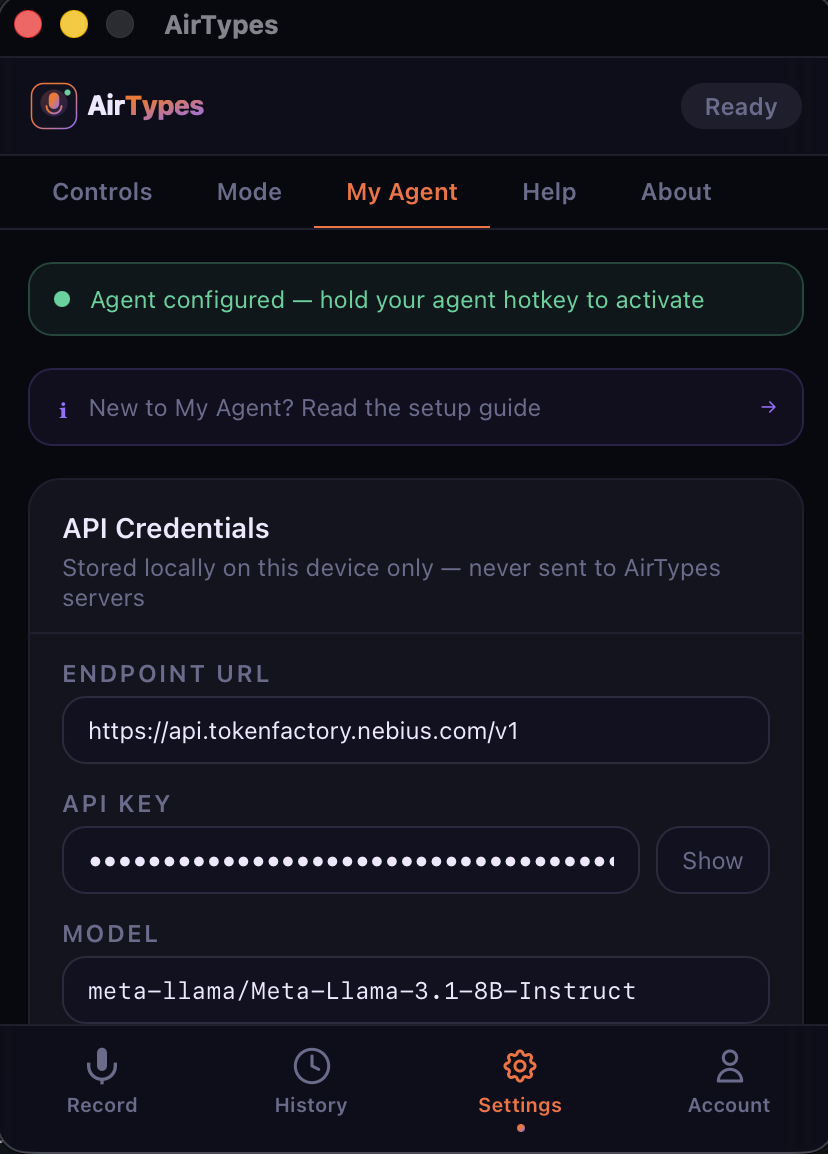
My Agent is what makes AirTypes different from every other dictation app. Instead of just transcribing your voice, it sends your speech through an AI model — and the AI's response types directly at your cursor.
How it works
- Go to Settings → My Agent.
- Enter your Endpoint URL — any OpenAI-compatible API (OpenAI, Anthropic via proxy, Ollama local, Nebius, Together, etc.).
- Enter your API Key — stored locally on your device only. Never sent to AirTypes servers.
- Select your Model — e.g.
gpt-4,claude-3-opus,meta-llama/Meta-Llama-3.1-8B-Instruct. - Hold the My Agent hotkey, speak your request, release. The AI response appears at your cursor.
Example use cases
- "Rewrite this email to be more professional" — speak casually, get polished output.
- "Explain this error message in simple terms" — the AI response types directly into your Slack message.
- "Write a regex that matches email addresses" — the code appears right in your editor.
- "Summarize the key points from what I just said" — instant structured output from a rambling voice note.
Privacy: your API key is stored locally in encrypted app storage. Your voice is transcribed on-device. Only the transcribed text is sent to your AI endpoint — no audio ever leaves your device.
Agent Profiles: context-aware AI
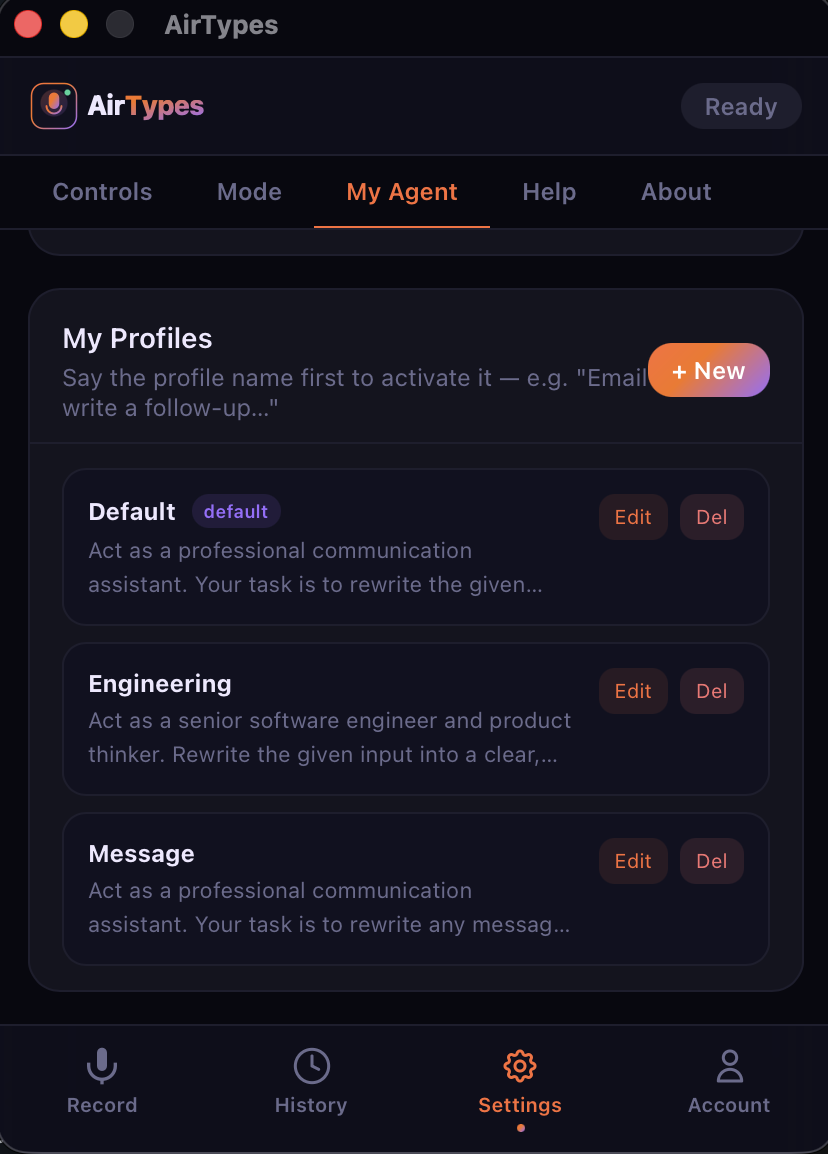
Agent Profiles let you create named system prompts that change how My Agent responds. Each profile has a name, a system prompt, and a purpose.
How to use profiles
- Go to Settings → My Agent and scroll down to My Profiles.
- Click + New to create a profile.
- Give it a name (e.g. "Engineering") and write a system prompt (e.g. "Act as a senior software engineer. Rewrite the given input into a clear, concise technical response.").
- When using My Agent, say the profile name first to activate it: "Engineering, refactor this function to use async/await."
Example profiles
- Default — general-purpose rewriting. Good for emails, messages, notes.
- Engineering — technical responses. Code suggestions, architecture decisions, debugging.
- Message — casual communication. Rewrites your voice into natural-sounding messages.
- Translate — you could create one that translates your English speech into Spanish (or any language).
Profiles are stored locally. You can edit, delete, or create as many as you need.
Transcript history and export
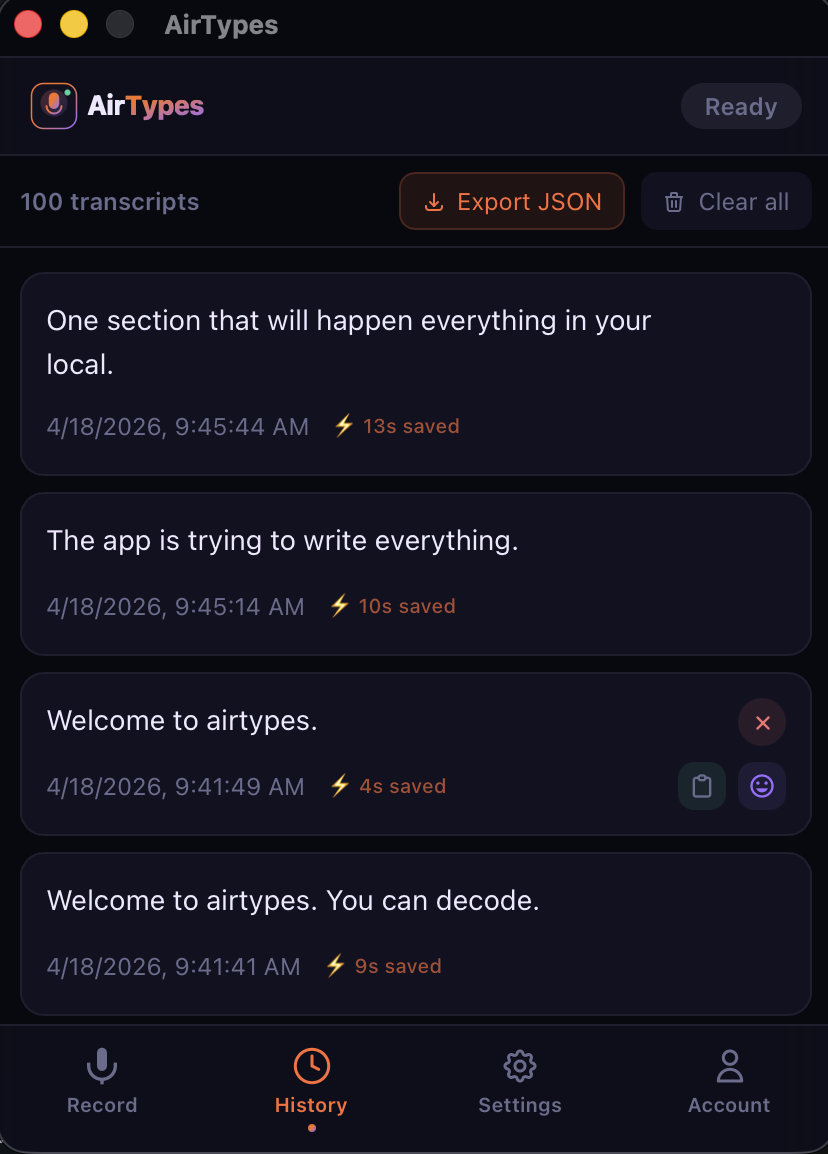
Every transcription AirTypes performs is saved locally in the History tab:
- Full text of each transcription.
- Timestamp — exact date and time.
- Time saved — how many seconds you saved vs. typing.
- Copy button — re-copy any past transcription to clipboard.
- Export JSON — download all transcriptions as a structured JSON file for analysis or backup.
- Clear all — delete history when you want a fresh start.
History is stored locally on your device. Nothing is synced to any server. Your transcriptions are yours.
Account stats and activity tracking
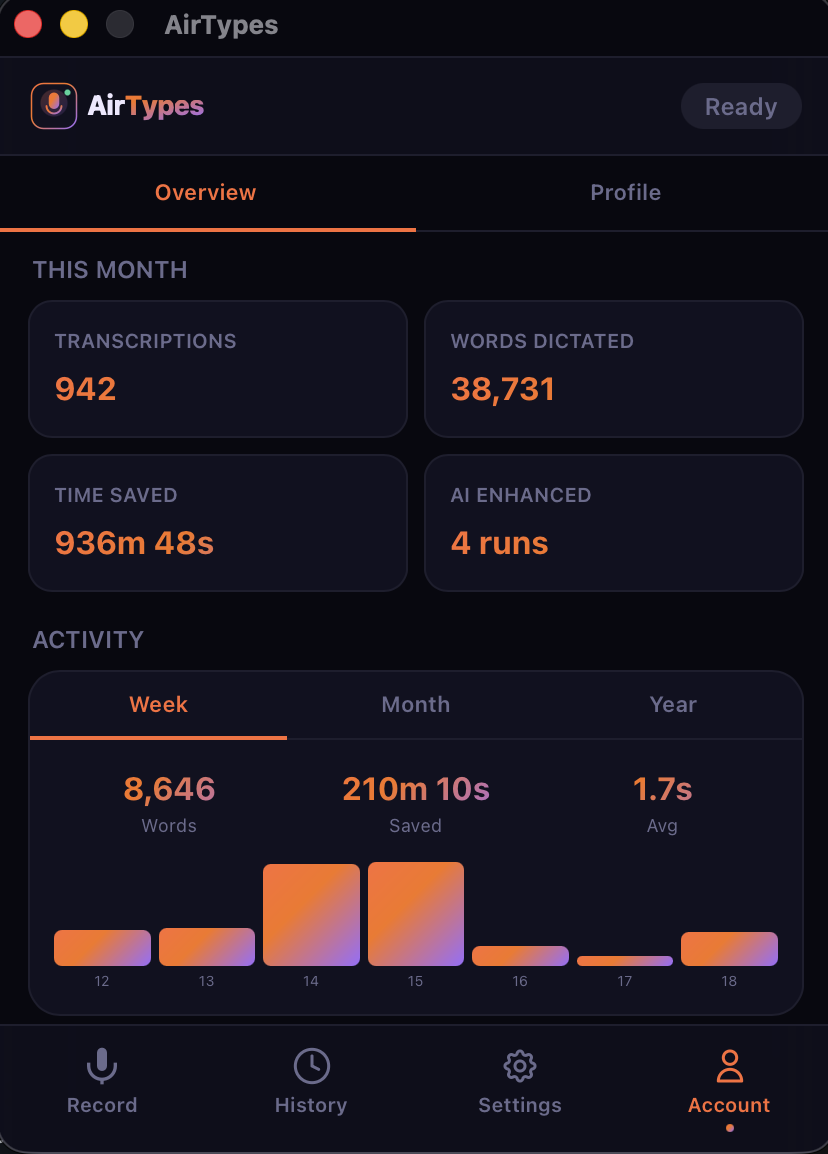
The Account tab shows your usage over time:
- Transcriptions — total number of voice-to-text sessions.
- Words Dictated — total words you've spoken through AirTypes.
- Time Saved — calculated based on 3× speed advantage of speaking vs. typing.
- AI Enhanced — number of times you used My Agent for AI-processed output.
- Activity chart — weekly/monthly/yearly view of your dictation volume with words, time saved, and average transcription time.
All stats are computed locally. AirTypes has zero analytics, zero telemetry, and zero data collection. These numbers are for you, not for us.
Getting started in 60 seconds
- Download AirTypes from airtypes.com/download — macOS (Apple Silicon & Intel) or Linux (.deb, .rpm, AppImage).
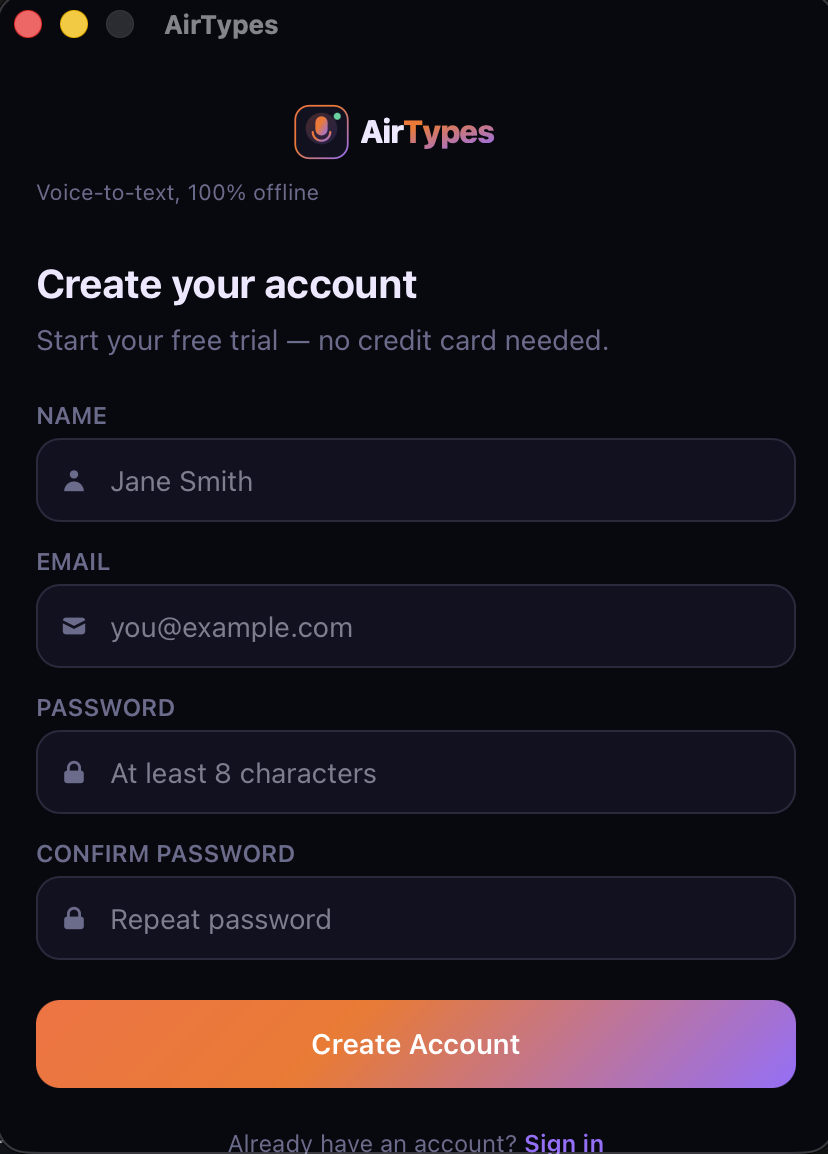
- Create an account — name, email, password. Free 7-day trial starts immediately, no credit card.
- Pick an accuracy tier — start with Crisp for a good balance of speed and accuracy.
- Set your hotkey — the default works out of the box, or customise it.
- Start dictating — place your cursor anywhere, press the hotkey, speak, release. Done.
The entire setup takes under 60 seconds. From download to your first transcription — that fast.